2010 Toyota Highlander Headlight Wiring Diagram – Locating the proper wiring diagram is the first task in repairing the front lights on a Toyota. Looking at the connector see will assist you to locate these. The shapes and keying in the individual connections will be different. They can even be identified by their shades as compared to the other cords. The next phase is to ensure your low beam headlights are functioning properly.
Adaptor view
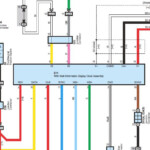
Discovering exactly how the wires is connected can help you determine a negative headlight. This issue can be positioned in many different ways. One strategy is to think about the bond see on the cabling diagram for your Toyota front lights. On the headlight, you will see a connector with pins originating from several places.
You will see how the numerous cables are attached to one another within the connection perspective. Every connector has a unique form and keying. The appropriate connector can even be identified by its color with regards to other wires. The connector’s kind is suggested by the coloration alongside it. The connectors may possibly at times have an arrow close to their label to really make it simpler to understand them.
Right match
The electrical wiring of brand new front lights to your Toyota can be hard, as anyone who has ever done it can attest. To be able to identify the ingredients you need to fix and the way to cable them correctly, you may need a Toyota headlight wires diagram. The good news is, there are some simple measures you can do to make sure the set up should go effortlessly.
Your headlight circuit may look like a relay circuit depending on the model. For example, you could do away with twice wires by making use of relays with double 87 terminals to all at once power the left and right filaments. Just be careful not to blend up terminal 87a with terminal 87.
The most frequent cause is a burned-out bulb, although numerous issues might cause headlights to malfunction. ground and Power troubles are two other prospective concerns. A high-beam failure typically indicates a relay or high-beam control switch issue, although replacement of a single failed bulb is necessary.
checking the low-beam headlights’ features
An elementary comprehension of the electric powered program of the Toyota is important to evaluate the reduced beam headlight’s functionality. Often times, a poor change or relay will be the way to obtain the issue. If necessary if this part is failing, check the wiring and replace it. Alternately, a reduce stalk-sort swap might be at blame.
Both headlight change and the entire body control unit are utilized to switch on the low beams. The relay’s coil is eventually provided a ground with the entire body handle module. A magnet discipline is created as current works from the coil. The associates are drawn close from the magnet industry, and current then passes by through these people to the headlight assemblage.
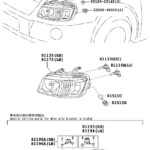
If it is loose or damaged if the headlights are not working, check the electrical connector to see. If it’s loose, try inserting it farther into the headlight housing. Try rotating the headlight socket in the opposite direction, as an alternative. If the headlights are not working, the wiring is probably not functioning properly, whatever the problem.
Automatic high lighting is certainly one of numerous features contained in Toyota automobiles. When investing in in close proximity to another car or even a light-weight that reflects from the street, this technique will quickly turn to higher lights. However, this feature will only operate at high speeds; it will not operate when traveling at low speeds in cities.
Gallery of 2010 Toyota Highlander Headlight Wiring Diagram